All posts by Allyson Locke, M.S., OTR/L

Collaborative Blog Project: Pencil Grips

Therapro recognizes the value in the experience that comes from therapists working in the field. Back in January, we tried a little experiment; we had you all tell us your best tips and tricks related to handwriting evaluations.  We then took all of that wonderful information and compiled it into a collaborative blog post.  The information that comes from this type of collaborative approach is invaluable, and so we have put together our second collaborative blog post on pencil grips.

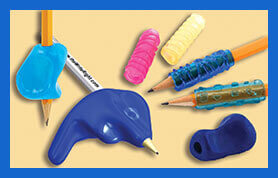
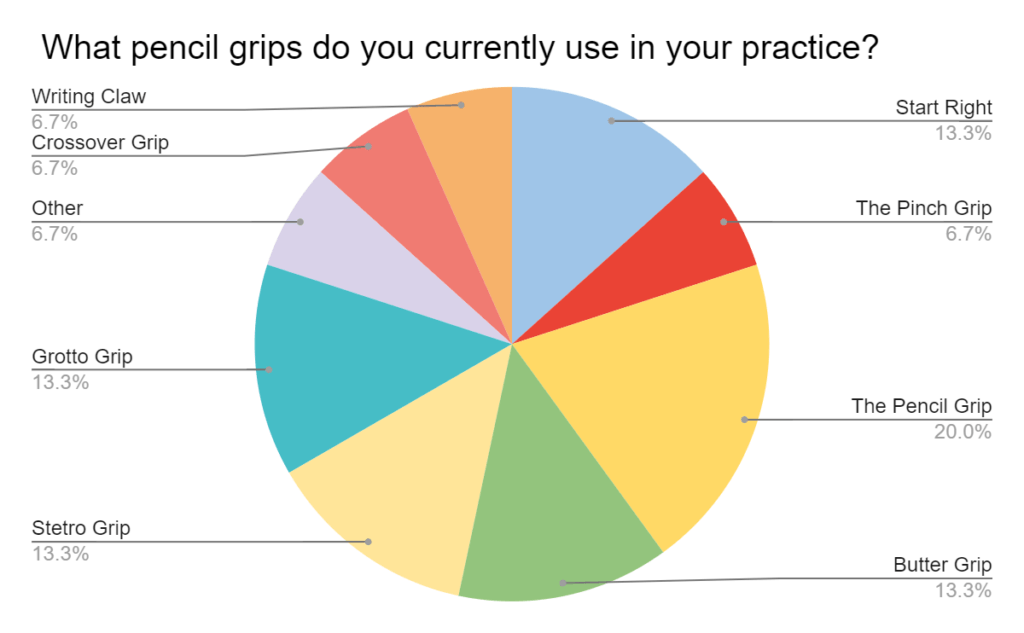
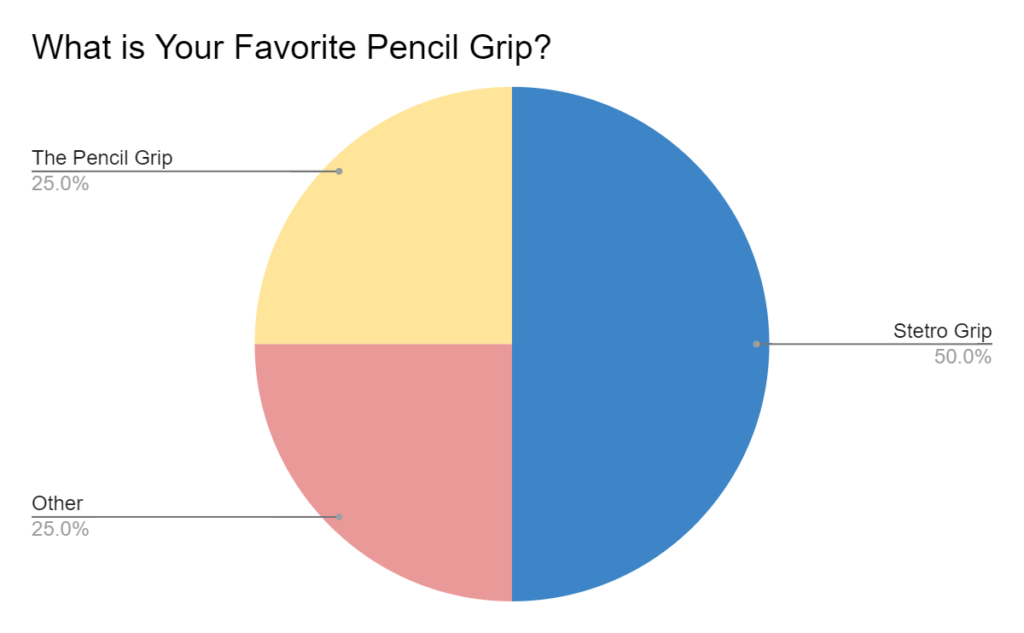
To gather information about the whats and whys of pencil grip usage, we asked you about the grips you are currently using, your favorite type of pencil grip, and the reason that you use grips. The Stetro Grip was identified as a favorite based on its size and “feel in little hands.” The Pencil Grip was a close second based on its design and because “students love it.” 

Pencil Grips: Survey Results

Which Pencil Grips Used when Choosing the Right Pencil Grip
Favorite Pencil Grips when Choosing the Right Pencil Grip
Why Use Pencil Grips

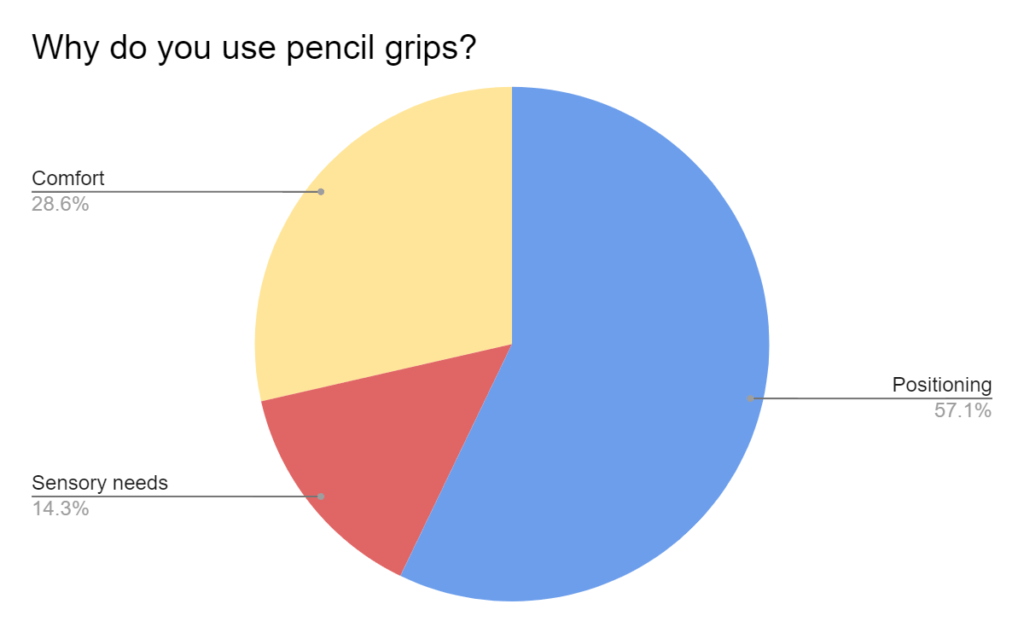
Some other great information that came out of this project was the ways therapists assess the need for pencil grips as well as tips and tricks therapists use to help promote a better pencil grasp.  

When determining the need for a pencil grip, the therapist Therapro surveyed suggested the following: 

  • Do a “Before and After”.  Assess a writing sample with and without a pencil grip to determine if the pencil grip influences legibility or changes the length of time a child is able to participate in the writing task.  
  • Just Ask!: A child’s willingness to use a pencil grip is often an overlooked factor but is absolutely critical. The user should always be an active participant in the decision to use a pencil grip and should have a role in deciding which one works best for them.
  • Check Applicability & Practicality.  Other important factors to consider include how practical is the pencil grip and is it applicable to the student’s current needs. Consider factors such as: Does the child switch classes/ have different environments that they are expected to do writing tasks in? Are there other writing instruments that the child uses (crayons, paintbrushes, etc.), and do they need to be modified in any way? Is the child still expected to do writing tasks or are they moving toward alternative input methods such as typing? 

Tips and Tricks for promoting functional grasp patterns included:

  • Hold small objects in the last two fingers to promote the separation of the two sides of the hand.
  • Use small writing tools (for example, broken crayons,  crayon rocks or short pencils) to promote the development of a tripod grasp.
  • Use triangular-shaped writing instruments to promote a tripod grasp. 
  • Use vertical surfaces (for example, tape the writing paper to the wall) or use slant boards for optimal hand placement and to promote better posture.
  • Highlight the writing space or use highlighter paper to help students write within the boundary area and to increase visual attention. 
  • In a pinch, wrapping clay around the pencil can be used for a pencil grip! 

Thank you to all of the wonderful therapists who took the time to share their expertise with us.  If you are looking for further guidance on choosing the right pencil grip, be sure to check out Therapro’s Get a Grip on Grips Handy Guide!

PowerLink 4 Control Unit Assistive Technology Solution

Enhance Access with the PowerLink

A PowerLink is a game-changer for enhancing access, especially for users who rely on switches to interact with the environment around them.  With a PowerLink, users can take everyday, corded, electrical appliances and make them switch accessible.  The concept is simple: plug a corded appliance into the receiver of a PowerLink, pick your interaction mode on the PowerLink, and add a switch. With this setup up users can control the on and off function of whatever corded appliance is plugged in.  The PowerLink opens the door for participation in a variety of everyday activities.  

  • Enhance Access with the PowerLink in Classrooms and Offices: Tools commonly used in the classroom or in an office setting are easily made switch accessible using a Powerlink. Try plugging in an electric pencil sharpener, electric stapler, electric hole punch, or paper shredder to allow switch users to become an active participant in vocational training opportunities or classroom jobs.  
  • Enhance Access with the PowerLink in the Garage: In woodshop class or in your home garage some simple, corded tools like an electric screwdriver or hand held sander can be made switch accessible with a Powerlink.  
  • Enhance Access with the PowerLink in the Kitchen: In the kitchen, plugging in simple appliances like a blender, hand mixer or can opener to a PowerLink can help users increase their participation in cooking activities.
  • Enhance Access with the PowerLink for Self Care: A well-positioned hair dryer plugged into a Powerlink can give users more independence with self care tasks like drying their hair after a shower or fingernails after a manicure! 

Looking for fun and creative ways to use your PowerLink? Download these activity ideas:

  1. Accessible Splash Art
  2. Make Music!
  3. Stimulate the Visual Senses!
  4. Switch Adapted Car Wash
  5. Switch Adapted ‘Bowling’

Collaborative Blog Project: Handwriting Evaluations

January 23 celebrated National Handwriting Day.  In honor of a holiday near and dear to many occupational therapists’ hearts, we tasked you all with sending us your best ideas, tips, tricks, and opinions on all things handwriting.  We then compiled these comments into Therapro’s first-ever series of collaborative blog posts.  Our first topic, handwriting evaluations! Here is what you all had to say:

Favorite & Most Helpful Handwriting Assessment or Evaluation Methods

Evaluation Tool of Children's Handwriting

By far most therapists surveyed relied on non standardized measures and skilled observations to collect information about a students handwriting.    When it came down to standardized measures the most popular were The Print Tool, The Evaluation of Children’s Handwriting (ETCH), and the Test of Handwriting Skills Revised.

Handwriting Evaluations: Pros & Cons

The Print tool

When discussing the pros and cons of each of these measures a few common themes emerged:

  • The Print Tool provides detailed information about a student’s physical approach to handwriting, but it can be time-consuming to administer and score.
  • Non-standardized measures can be quick and easy, but don’t provide needed normative data.
  • It is difficult to gain reliable information when a student does not yet know the alphabet. 

Other Factors to Consider When Evaluating Handwriting

Visual Perceptual Skills-4

Therapists surveyed indicated that evaluating a student’s motor performance as well as visual perceptual skills was a critical aspect of the handwriting assessment process.  Sensory, environmental, and psychosocial factors were also identified as areas to include when assessing a student’s handwriting.

Helpful Hints & Suggestions for Evaluating Handwriting

  • Include both a near-point and far-point copy task.
  • Include observations of the student performing both preferred and nonpreferred tasks.
  • When observing a child writing, position yourself for an optimal view of the student’s writing hand.
  • Eliminate distraction.
  • Have grips, different seating options, adaptive paper, and a variety of writing tools available to try.
  • Have letter strips available for visual reference.
  • Choose a topic that is of interest to the student to write about.
Handwriting Tools
Adaptive Paper

Thank you to all of the therapists who shared their knowledge and expertise!