All posts by Guest Blogger

The App That Awakens Sensory Channels: Luminea App

Alba Alier, SLT

In this post I want to talk about a free App which will allow you to control any Luminea lighting device in your space or a multisensory room in a very fun, creative and playful way. The Luminea App has been designed to make the most of therapeutic intervention in a space or sensory room (or even in a Snoezelen room), as it serves to control the colors of the different lighting elements in a simple manner, and facilitates development and learning.

It is free to download, and once you have it installed on your Android smartphone or tablet you can start controlling all the Luminea lighting elements of your room, such as the bubble tube, the fiber optics, a ball pool, etc. You can control them individually (by changing the device type in the menu) or in groups for a more immersive effect.

What Can I Do With The Luminea App?

The Luminea App allows you to control the Luminea lightning devices from your smartphone or tablet by changing the color of the devices when touching on a photo. In this way, the colors of the light changes according to the subject matter. Imagine, for example, that you tap on the yellow part of a rainbow image and the lights in your room turn yellow. Or, the bubble tube turns green when you tap on a photo of a kiwi fruit or all the lighting elements in the room turn red when you tap on a clown’s nose. It’s so fun!

This App includes a variety of activities and games for you to play with lighting elements and lets your users or students take control of the room. In addition, you can customize everything, record color sequences or add as many photos as you want (your own or internet ones) to make the sessions more personal.

What does it mean? Only with  Luminea App you can include countless customized activities in your sessions:

  • Create choreographies with your favorite music and make all the elements ‘dance’ with you. You can play these choreographies whenever you want, as they are stored on your device.
  • Upload your own photos and play with their colors. You can upload a photo of your last holiday or your favorite animal, and by tapping on a colored point in the image, all the room will turn that specific color. ¡It works automatically!
  • It includes multiple games and activities, but you can also create your own unlimited activities.

We help to promote and encourage cause-effect relationships with these types of games, as well as memory, choice, interaction… In the case of group activities, it also helps to enhance communication, joint attention and social skills.

Start With A Small Corner!

With the Luminea App you can control all the Luminea light devices and become a master of light by taking control of your room like never before. If you want to get started in the sensory world, you can start with the Luminea Corner, which allows you to have a small interactive world made up of a bubble tube, and fiber optics and to add devices little by little, as they will always be compatible

The Luminea App is fun and therapeutic; it combines the elements of your multisensory room in a group setting and takes your users into an immersive world. In this video we show you all the Luminea elements and how easy it is to use the App. In addition, you can learn about other different ways to control your devices, according to the switch your users prefer (a 6 button, a giant die (Sensory Cube), a colored mat (Sensory Step), etc.)

How Does Luminea App Work?

The Luminea App is very intuitive and easy to use.

  • All you need is an Android smartphone or tablet connected to the same WiFi network as your multisensory room (and all other Luminea devices). It works with one or add all of them at the same time!

Raised Line Paper… What Is It?

Sarah Glovasky M.S. OTR/L

Sometimes called tactile paper, Raised Line Paper is used to help individuals stay between the lines when writing. The raised line paper has raised top and bottom lines to provide tactile, proprioceptive and visual feedback to the writer. There are a variety of types of paper to choose from!

Raised Line Learning Sheets

Do you have a beginner writer? The raised line learning sheets are a good place to start from! There are letters, numbers, alphabet coloring sheets and mazes! The tactile input helps the new learners understand where to keep their pencil and crayon marks! 

Raised Line Writing Paper

There are so many options to help more advanced writers be as successful as they can. There are different sized lines (narrow and wide) depending on the level of the writer. If you need more of a visual cue there is the option to have red and blue lines on your paper. Double the input for a higher accuracy when writing. If spacing or sizing is a problem there is boxed raised line paper to provide a space for every letter to fit in. Pro tip: If all this sounds great but you are not sure what will work best the assortment pack is very helpful!

Staged Raised Line Paper

There is a product line that is able to take a writer from beginning stages right through advanced writing. This is a six stage series of handwriting papers that begins with clearly defined writing spaces and perceptual cues that fade in successive stages as the student gains mastery. The thick, colorful dark blue baselines are raised, providing not only visual cues, but also tactile cues.  Pro Tip: Students advance at their own pace so having all the stages on hand is very helpful!

Stage One: For beginning writers. Clearly defined writing spaces.

Stage Two: Writing spaces are less defined as shading is partially removed.

Stage Three: Shading has been completely removed and replaced with a borderline.

Stage Four: Writing spaces are less structured; fewer distractions than typical notebook paper.

Stage Five: The most popular Stage Write paper! Spacing between blue baseline and gray guideline reduced to 1/4″.

Stage Six: Comparable to standard notebook paper. Still incorporates raised dark blue baseline and clearly defined margins.

Another great aspect of all this paper is it can be used with a variety of reading/writing/handwriting programs! Give your writers the tools they need to be successful independent writers.

The Sensory Space – An Essential In Your Classroom

Guest blog from The Manimo Team

The school and classroom provide a wealth of sensory information. Whether or not your students have special needs, processing sensory information can be a real challenge and also impact their behavior (e.g. difficulty paying attention, sitting still, working cooperatively with others, etc.).

Sensory processing difficulties arise when the brain can’t sort, organize, analyze, or integrate sensory messages. It’s like a “traffic jam” in the brain, with a few snippets of sensory information “stuck in circulation”. When this happens, certain parts of the brain don’t receive the sensory information they need to do their job. (1)

Providing a sensory space helps students to calm down and is a way to avoid disorganization. It’s a simple solution for improving social-emotional behaviors and beneficial for cognitive development.

What Is A Sensory Corner?
A sensory corner is a designated area inside your classroom that is dedicated to supporting the sensory development of all students. It allows the child to take refuge there completely independently. Their withdrawal into this space helps them regulate their emotions and energy level in order to be more available to learn and interact with others.

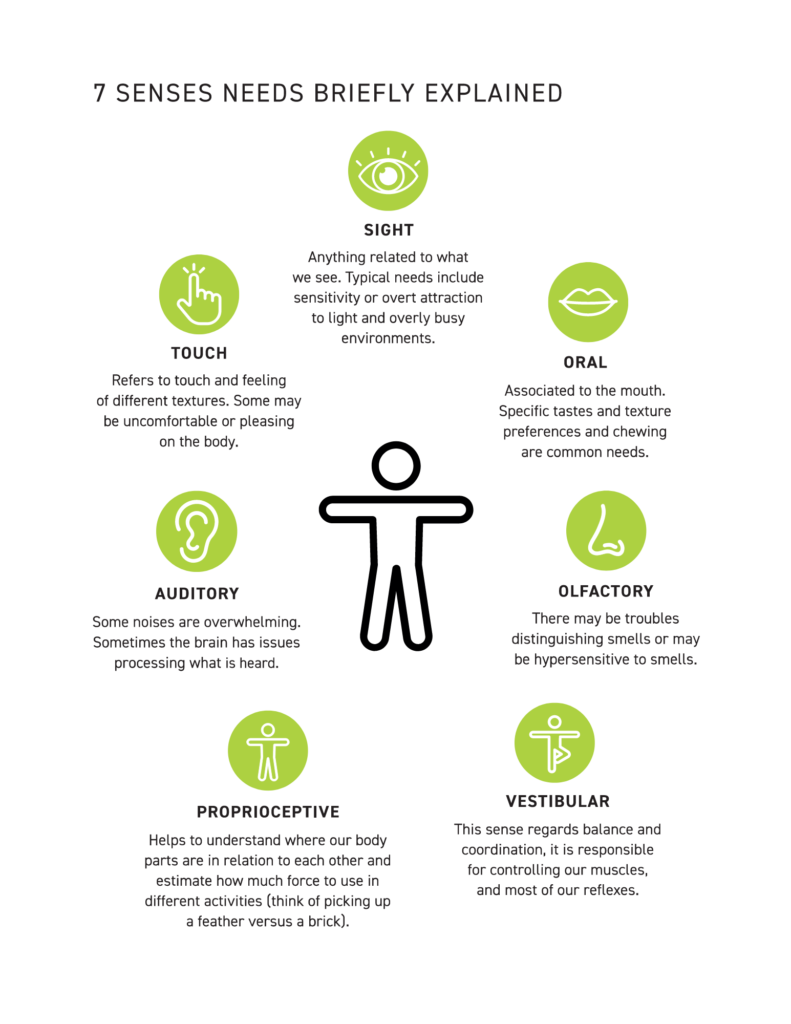
A sensory space stimulates the primary senses; sight, hearing, smell, touch, vestibular and proprioception without creating overload because the senses are chosen on a voluntary basis.
The Benefits Of A Sensory Corner
These very precious moments, lasting at least 15 minutes, improve mood management by taking care of one’s emotions, increasing the feeling of security, and help reduce agitation and apathy (lack of energy). No wonder they allow for the improvement in attention and quality of concentration.

Regulating our senses is important in maintaining our mental and physical well-being and self-esteem. The sensory space allows for wonderful one-on-ones or supports a moment of guided learning, if the space is sufficient to accommodate the adult and child.

How To Design A Classroom Sensory Space

  • It must be welcoming, comfortable and a defined space. The area has boundaries and is large enough to accommodate at least one seat (armchair, cushion, carpet, etc.).
  • Make sure the child will be isolated from ambient noise or the hallway.
  • Make sure you can adjust the light intensity or filter it. Some children will seek intense light while others will benefit from dim lighting.
  • Try to find a corner of the class where the student can have some privacy, out of sight of their peers. To enclose this space, you could use a curtain or furniture such as a bookcase or shelf.
  • Ideally, provide storage for the items or equipment that your corner will offer. The space should not be overloaded with things.

The objective is to be able to immerse yourself in a “cocoon-bubble” atmosphere in order to experience better sensory stimulation and enjoy all the benefits.

The effectiveness of a sensory corner has nothing to do with your allocated budget. It’s therefore not necessary to invest in expensive and sophisticated equipment.

What equipment should you provide in your sensory corner?
Your sensory corner can evolve over time and according to the needs of your students. Here are some suggested items that can stimulate the senses.

Touch
– Manipulative tools such as stress balls, fidgets
– Tray with play dough
Vibrating cushion
Massage accessory
– Homemade sheet/board with different textures on it (sandpaper, fur, silk, feathers, etc.)

Hearing
Noise cancelling headphones
-Earphones and radio
Rain stick

Smell
– An accessory or cushion that you can put a few drops of essential oils on (ex: lavender)
– Scented putty
– Small cotton sachet (for the bottom of a drawer) with different smells

Sight
Lamp (Lava type, scintillating, plasma, fiber optic, etc.)
Mini flashlight, mini battery-operated candle
Light tube
– Hourglass or sensory tube
– Homemade glitter bottle

Vestibular (balance and movement)
Disc or balance board
Air cushion
– Surfboard

Proprioception
Weighted animals
Ghost
Resistance Band
Bean bag
Sensory peapod

You could display or make available inspirational thoughts, relaxing music, pictures to color, breathing strategies, a timer to give the child perspective about time.

And the most important…
Once your sensory space has been established, take the time to show it to your students and teach how to use it, when, and why so that they understand the purpose of this space.

It’s also important to display the tools and resources available in the space. Don’t hesitate, for example, to demonstrate breathing techniques in a large group so that they know how to repeat them when alone.

Having a space like this is a great way to implement social-emotional learning strategies in your classroom.

And now, play on!

The manimo team

About manimo
For 20 years, manimo has comforted thousands of children at home and school. manimo’s range of weighted animals are all equally attractive. It’ll be a must have in your sensory space to stimulate your student’s proprioception and touch senses.

Discover manimo weighted animals

1 Sensory Spaces in School 2021.  National Council for Special Education, NCSE – Sensory Spaces in Schools