Category Archives: Education

Raised Line Paper… What Is It?

Sarah Glovasky M.S. OTR/L

Sometimes called tactile paper, Raised Line Paper is used to help individuals stay between the lines when writing. The raised line paper has raised top and bottom lines to provide tactile, proprioceptive and visual feedback to the writer. There are a variety of types of paper to choose from!

Raised Line Learning Sheets

Do you have a beginner writer? The raised line learning sheets are a good place to start from! There are letters, numbers, alphabet coloring sheets and mazes! The tactile input helps the new learners understand where to keep their pencil and crayon marks! 

Raised Line Writing Paper

There are so many options to help more advanced writers be as successful as they can. There are different sized lines (narrow and wide) depending on the level of the writer. If you need more of a visual cue there is the option to have red and blue lines on your paper. Double the input for a higher accuracy when writing. If spacing or sizing is a problem there is boxed raised line paper to provide a space for every letter to fit in. Pro tip: If all this sounds great but you are not sure what will work best the assortment pack is very helpful!

Staged Raised Line Paper

There is a product line that is able to take a writer from beginning stages right through advanced writing. This is a six stage series of handwriting papers that begins with clearly defined writing spaces and perceptual cues that fade in successive stages as the student gains mastery. The thick, colorful dark blue baselines are raised, providing not only visual cues, but also tactile cues.  Pro Tip: Students advance at their own pace so having all the stages on hand is very helpful!
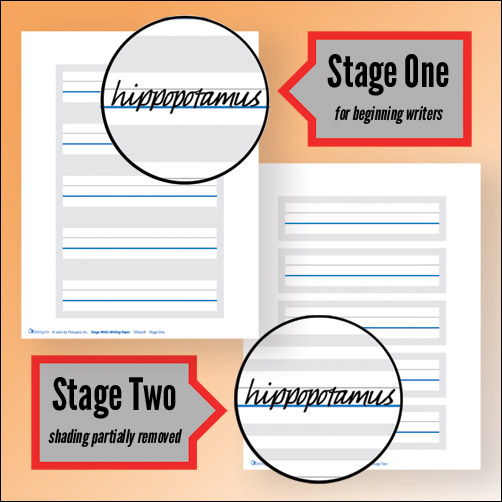
Stage One: For beginning writers. Clearly defined writing spaces.

Stage Two: Writing spaces are less defined as shading is partially removed.
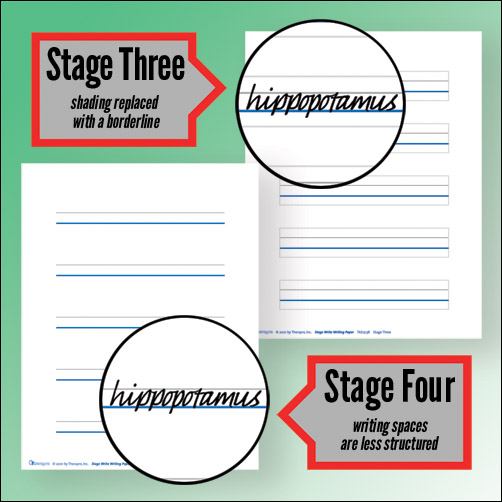
Stage Three: Shading has been completely removed and replaced with a borderline.

Stage Four: Writing spaces are less structured; fewer distractions than typical notebook paper.
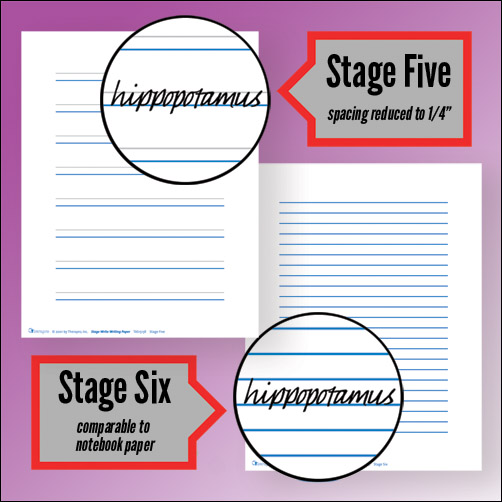
Stage Five: The most popular Stage Write paper! Spacing between blue baseline and gray guideline reduced to 1/4″.

Stage Six: Comparable to standard notebook paper. Still incorporates raised dark blue baseline and clearly defined margins.

Another great aspect of all this paper is it can be used with a variety of reading/writing/handwriting programs! Give your writers the tools they need to be successful independent writers.

Setting up Your Seat for Virtual Learning Success

Having just the right seating arrangement can make the difference between a successful learning experience and one that is full of distractions, position changes, and learning sessions that don’t  last as long as they should.   Two of the biggest factors to consider are the physical set up and the sensory needs. 

Physical Set Up

One of the most important considerations in addressing physical needs is the 90/90/90 rule.   When seated in a chair, feet should be resting comfortably on the floor with a 90 degree angle at the hips, knees and ankles. The work surface should be at a height  that allows the forearms to rest with the shoulders in a neutral position.  

Sensory Needs

When addressing sensory needs related to positioning it is important to consider getting enough of the right kind of sensory stimulation.  Virtual learning has provided long hours sitting at the computer or workspace for both those providing the virtual services and those receiving them.  Virtual learning spaces are often devoid of the naturally occurring sensory stimuli sensory systems need to stay alert and focused.  Classrooms, therapy rooms, and other work spaces are full of naturally occurring stimuli like  enriching conversation with our fellow therapist, the chitter chatter of classmates, naturally occurring movement breaks as we move from one part of the building to another.  Our sensory systems need stimuli to keep alert and focussed. 

Try This: 

  1. Support the feet.  When a chair is too big, legs and feet are left dangling and unsupported, decreasing postural stability needed for hand use.  Adding a foot stool or foam mat under the feet provides the needed support.  Using a  foam mat has the added bonus of additional sensory input! 
  1. Support the back: An oversized chair results in the body being in an awkward extended position with the hips and knees not being able to  flex at the desired 90 degree angles.  Placing a seat wedge or towel roll between the child’s back and the chair back will help bring the child forward enough on the chair to allow the hips to flex to 90 degrees and the knees to bend appropriately over the edge of the chair. This position will  increase overall comfort  resulting  in increased stamina for the work task.  
  1. Bring Work to Eye Level.  When the work surface is too low the natural tendency is to lean forward resulting in losing the 90 degree angle at the hips. A quick fix is to  use a slant board which brings the work higher and reduces the lean forward.  
  1. Use a Seat Cushion.  When the work surface is too high, the forearms are positioned in a way that brings the shoulders up closer to the ears decreasing over stability and comfort.  If changing the table or chair height is not an option, sitting on a folded towel, a book, or a cushion  can help but make sure the child’s feet are still securely on a firm surface like a step stool! Additionally, cushions provide needed sensory input!   Tip; use dycem to keep these positioning aids in place! 
  1. Use  Alternative Seating
    • Do you want to increase a student’s alertness and ability to focus during extended seating activities? Add movement such as the  Alert Seat or the Kore Wobble Chair!
    • Alternatively, long hours in front of a computer screen trying to filter out extraneous background sensory stimuli can lead to overstimulation.  When calming or organizing input is needed try adding a foot fidget to the chair legs, placing a portable foot fidget under the workspace, or having a foot tapper available.  Other options included weighted lap pads or shoulder wraps.  
  1. Position Changes.   Incorporating position changes through the work or school day is a great way to maintain attention and focus,
    • Standing at a counter height work space or taping work to a wall are options to allow for standing positions while working. 
    • Lay down.  Working while laying on the stomach is a great way to provide proprioceptive input through the shoulders joints (great for those needing calming and organizing input).  This position also gives students who are struggling with postural instability more support so they can focus on their work and not on staying stable!  Use yoga mats or cushions to provide comfort and a clipboard or slant board as a work surface. 
    • Get Cozy.  Another option for a position change  is a bean bag.  While not the best option for all types of tasks this is a great spot when reading or listening to an activity. The deep pressure input provides a great calming and organizing input.  

Many of us have made the sudden change from a full day in a classroom or work environment with naturally occurring, enriching sensory experiences to alternative work spaces that may not always provide the type or intensity of sensory stimulation we need to stay alert and  focused. Changing up the seating arrangement can be a great way to increase attention and focus during long days of virtual learning or teletherapy sessions.  

Allyson Locke M.S., OTR/L

Therapro A-Tech Virtual Learning

by Abbie King, MS, CCC-SLP, ATP

2020 has brought a whole new set of challenges where we as educators need to get creative. Simple low to mid-tech assistive technology tools can make the virtual learning experience less stressful and more productive for all students. 

Here are some simple low tech tips and tricks to make virtual learning easier. 

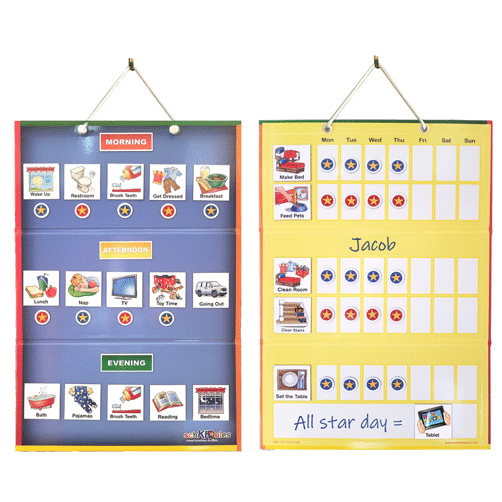
  1. Use a visual schedule
    • Why? Visual schedules allow students to visually see an overview of their entire day. This can help reduce frustration and ease the anxiety relating to transitions.
    • What?  These schedules should include the time each activity is occurring and a picture or word to represent the activity. These schedules can be created using real photos, images, or icons. 
    • Easy Option: For a ready to go option, our new  SchKidules provide these symbol representations for everyday school and home-based activities. 
  1. Make sure your laptop is at the correct angle and height
    • Why? When a computer is too low, it creates a tendency for the body to lean forward. This causes strain on the neck and discomfort!
    • How?  One great way to create the correct angle and height is by using a slant board and a piece of Dycem. Place the Dycem on top of the slant board and the laptop on top of the Dycem. The Dycem will create a non-slip surface so the laptop does not slide off. Ahhh…relief from neck pain!!
  1. Break down visually overwhelming information
    • What? When using worksheets or printed work, the directions and visuals may be visually overwhelming for students who have difficulty filtering out extraneous visual stimuli.
    • How? We can reduce these visual distractions by using highlighter strips, reading guides, or even laminated index cards. The student can guide these low tech tools across their piece of paper to block out all extraneous material and focus on each sentence they are trying to read. 
  1. Use adapted tools whenever needed
    • Why? Students with physical disabilities should be supplied with adapted tools to promote the most independence as possible. 
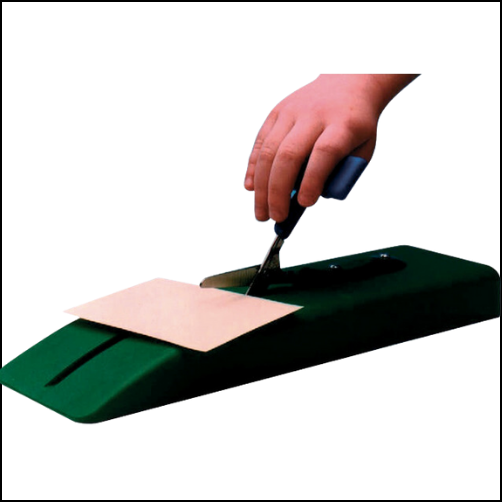
    • What? Examples of some of these tools include, adapted scissors, EazyHolds, and the Functionalhand
      • Adapted scissors allow students with decreased fine and gross motor abilities to independently use scissors. A variety of options exist including scissors on a sturdy base, scissors that open on their own, and scissors that don’t require the user to place their fingers in the holes
      • EazyHolds and the Functionalhand allow a student who does not have a functional grasp pattern to independently use a pencil, marker, spoon, stylus, etc.  The Functionalhand can give a student a sturdy grip on objects while allowing the student to use the object at a functional angle. The Eazyhold can be used in conjunction with the Functionalhand to securely hold the handle of the Functionalhand in the student’s hand. Eazyhold can also be used on their own to support independent grasp of everyday objects (e.g., cups, brooms, spoon, etc.)
  1. Provide alternative access solutions when necessary. 
    • What? If a student cannot independently access virtual work, they should be provided with an alternative way to access the material, whether that is on the computer or via printed materials. 
    • How? A BIGtrack 2 trackball, provides a sturdy base with a rolling ball that can be used in lieu of a typical mouse.  

There are many options available to make virtual learning more accessible, we hope you have found a tip or two to make your virtual learning experience successful!