Tag Archives: assistive technology professionals (ATPs)

Access curated tools, equipment, research, and resources tailored for Assistive Technology Professionals (ATPs) supporting individuals of all ages with access challenges across clinical, educational, and community-based settings to enhance functional independence.

Raised Line Paper… What Is It?

Sometimes called tactile paper, Raised Line Paper is used to help individuals stay between the lines when writing. The raised line paper has raised top and bottom lines to provide tactile, proprioceptive and visual feedback to the writer. There are a variety of types of paper to choose from!

Raised Line Learning Sheets

Do you have a beginner writer? The raised line learning sheets are a good place to start from! There are letters, numbers, alphabet coloring sheets and mazes! The tactile input helps the new learners understand where to keep their pencil and crayon marks! 

Raised Line Writing Paper

There are so many options to help more advanced writers be as successful as they can. There are different sized lines (narrow and wide) depending on the level of the writer. If you need more of a visual cue there is the option to have red and blue lines on your paper. Double the input for a higher accuracy when writing. If spacing or sizing is a problem there is boxed raised line paper to provide a space for every letter to fit in. Pro tip: If all this sounds great but you are not sure what will work best the assortment pack is very helpful!

Staged Raised Line Paper

There is a product line that is able to take a writer from beginning stages right through advanced writing. This is a six stage series of handwriting papers that begins with clearly defined writing spaces and perceptual cues that fade in successive stages as the student gains mastery. The thick, colorful dark blue baselines are raised, providing not only visual cues, but also tactile cues.  Pro Tip: Students advance at their own pace so having all the stages on hand is very helpful!

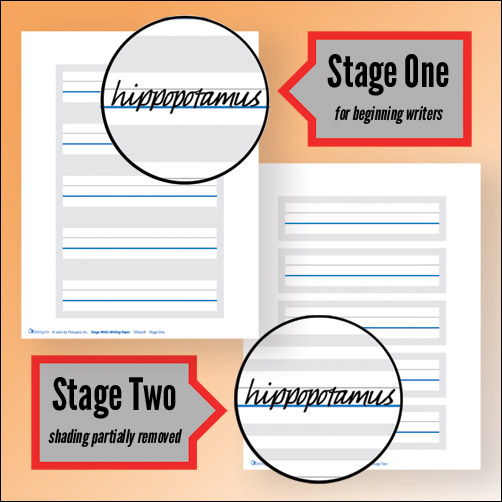
Stage One: For beginning writers. Clearly defined writing spaces.

Stage Two: Writing spaces are less defined as shading is partially removed.

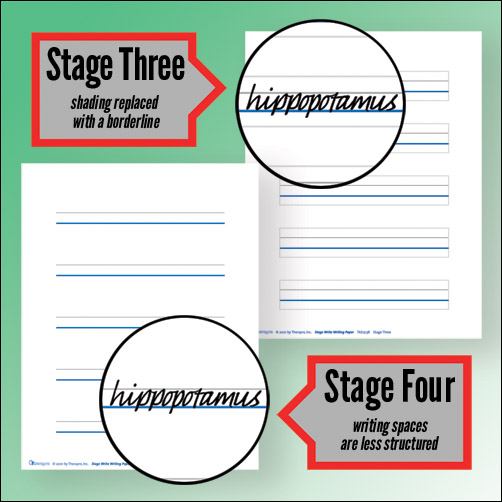
Stage Three: Shading has been completely removed and replaced with a borderline.

Stage Four: Writing spaces are less structured; fewer distractions than typical notebook paper.

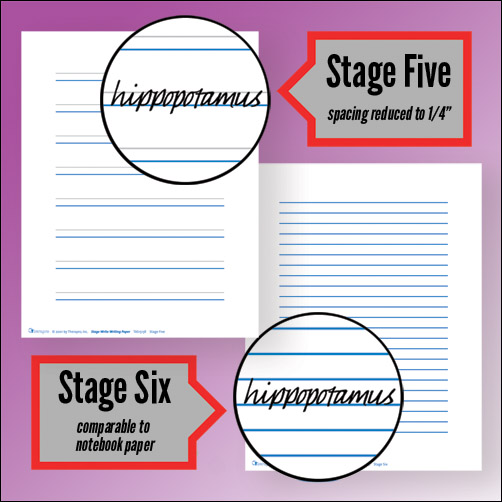
Stage Five: The most popular Stage Write paper! Spacing between blue baseline and gray guideline reduced to 1/4″.

Stage Six: Comparable to standard notebook paper. Still incorporates raised dark blue baseline and clearly defined margins.

Another great aspect of this paper is that it can be used with a variety of reading/writing/handwriting programs! Give your writers the tools they need to be successful, independent writers.

Guest Blogger: Sarah Glovasky M.S. OTR/L

More Than Just A Slant Board!

Slant boards are an invaluable therapeutic tool. They are a staple feature in classrooms and an added bonus to a well-equipped homework station. The versatility of slant boards allows for endless uses; they can be used at desks or tables during seated work, on a counter when working in a standing position, or even on the floor when working in the prone position (pro tip- this is a great way to develop important postural muscles!).  Some great benefits to using slant boards are:

Improve Pencil Grasp!
Writing on a surface that is positioned at an approximate 20 degree angle will put the wrist in the optimal extended position. This positioning encourages better pencil grasp and fine motor control.  Therapro’s Better Boards are lightweight and portable, making it easy to access the benefits of an angled writing surface just about anywhere!

Increase Attention & Focus!
Bringing visual information closer to eye level helps increase visual attention and focus.  It can also help decrease eye strain.  Place reading material on a slant board (or even a book holder) helps bring materials closer to eye level. 

Improving Posture!

Placing work materials on a raised surface, like a slant board, can help to decrease the rounded back posture. (Pro tip, ensure the angle of the slant board is at least at 22 degrees! ) The Aluminum Adjustable Slant Board and Adjustable/Collapsible Lightweight Slant Board both feature an adjustable angle, making it easy to find the perfect height!

Increasing Accessibility!
Many slant boards feature a clip to hold and stabilize papers. This feature is beneficial for one handed access or when bilateral coordination is decreased.  Write Slant Boards have an extra large clip for even easier access!

Slant boards are a great therapeutic tool for solving a variety of visual perceptual, fine motor and postural challenges!

Allyson Locke M.S., OTR/L & Sarah Glovasky M.S., OTR/L 

Using A Battery Interrupter: As Easy As 1, 2, 3!

Incorporating battery interrupter devices into therapeutic and educational settings can significantly enhance accessibility and engagement for individuals with motor challenges. These devices allow standard battery-operated toys and tools to be adapted for use with external switches, promoting independence and participation.

What Is a Battery Interrupter?

Battery interrupters are a useful tool for making battery-operated devices or toys switch-adaptable! Battery interrupters can be used on most devices that are: 

  1. Powered by AA, AAA, C, D, or 9-Volt batteries. 
  2. Turn on or off with a single switch.

Try using a battery interrupter on a commercially available electric bubble toy for some great summer fun or on a simple, battery-operated, musical toy for a cause-and-effect teaching opportunity! 

Benefits of Using Battery Interrupter Devices

  • Enhanced Accessibility: Facilitates interaction with a variety of battery-operated devices.
  • Promotes Independence: Empowers users to control their environment with minimal assistance.
  • Versatility: Can be used across multiple settings, including homes, schools, and therapy centers.
  • Cost-Effective: Adapts existing devices, reducing the need for specialized equipment.

Step-by-Step Guide: Using Battery Interrupter Devices

Setting up a battery interrupter takes just a few simple steps. 

  1. Step 1: Insert the interrupter into the battery compartment between the battery and the compartment wall.  For the 9-volt interrupter, simply clip together the two connection points.   

Pro Tip 1- Only one interrupter is needed per device, regardless of how many batteries are used.

Pro Tip 2- The battery interrupter can be inserted on either the positive or negative end of the battery (n/a for the 9V size)!

  1. Close the battery compartment.

Pro Tip: You may need to cut a small notch out of the battery cover to allow the wires to fit!

  1. Connect your device.

Pro Tip: Battery interrupters work with any standard switch that has a 1/8inch jack

Helpful Hints

  1. Make sure the size of the interrupter matches the size of the battery.  
  2. Turn your device to the “on” position before using it with a switch.  
Diagram showing how to use a Battery Interrupter Device

Tips for Effective Use

  • Safety First: Always supervise the use of adapted devices to prevent accidents.
  • Regular Maintenance: Check connections and battery levels to ensure consistent performance.
  • Customization: Tailor the setup to the individual’s specific needs and preferences.

Using battery interrupter devices is a straightforward and impactful method to enhance accessibility for individuals with motor challenges. By adapting existing battery-operated items, these devices open up new avenues for interaction, learning, and independence.