Tag Archives: assistive technology professionals (ATPs)

Access curated tools, equipment, research, and resources tailored for Assistive Technology Professionals (ATPs) supporting individuals of all ages with access challenges across clinical, educational, and community-based settings to enhance functional independence.

Using A Battery Interrupter: As Easy As 1, 2, 3!

Incorporating battery interrupter devices into therapeutic and educational settings can significantly enhance accessibility and engagement for individuals with motor challenges. These devices allow standard battery-operated toys and tools to be adapted for use with external switches, promoting independence and participation.

What Is a Battery Interrupter?

Battery interrupters are a useful tool for making battery-operated devices or toys switch-adaptable! Battery interrupters can be used on most devices that are: 

  1. Powered by AA, AAA, C, D, or 9-Volt batteries. 
  2. Turn on or off with a single switch.

Try using a battery interrupter on a commercially available electric bubble toy for some great summer fun or on a simple, battery-operated, musical toy for a cause-and-effect teaching opportunity! 

Benefits of Using Battery Interrupter Devices

  • Enhanced Accessibility: Facilitates interaction with a variety of battery-operated devices.
  • Promotes Independence: Empowers users to control their environment with minimal assistance.
  • Versatility: Can be used across multiple settings, including homes, schools, and therapy centers.
  • Cost-Effective: Adapts existing devices, reducing the need for specialized equipment.

Step-by-Step Guide: Using Battery Interrupter Devices

Setting up a battery interrupter takes just a few simple steps. 

  1. Step 1: Insert the interrupter into the battery compartment between the battery and the compartment wall.  For the 9-volt interrupter, simply clip together the two connection points.   

Pro Tip 1- Only one interrupter is needed per device, regardless of how many batteries are used.

Pro Tip 2- The battery interrupter can be inserted on either the positive or negative end of the battery (n/a for the 9V size)!

  1. Close the battery compartment.

Pro Tip: You may need to cut a small notch out of the battery cover to allow the wires to fit!

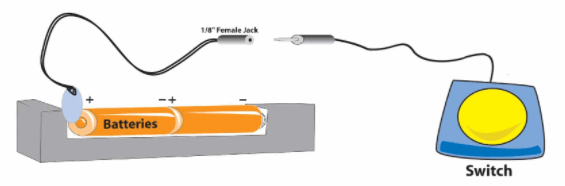
  1. Connect your device.

Pro Tip: Battery interrupters work with any standard switch that has a 1/8inch jack

Helpful Hints

  1. Make sure the size of the interrupter matches the size of the battery.  
  2. Turn your device to the “on” position before using it with a switch.  
Diagram showing how to use a Battery Interrupter Device

Tips for Effective Use

  • Safety First: Always supervise the use of adapted devices to prevent accidents.
  • Regular Maintenance: Check connections and battery levels to ensure consistent performance.
  • Customization: Tailor the setup to the individual’s specific needs and preferences.

Using battery interrupter devices is a straightforward and impactful method to enhance accessibility for individuals with motor challenges. By adapting existing battery-operated items, these devices open up new avenues for interaction, learning, and independence.

PowerLink 4 Control Unit Assistive Technology Solution

Enhance Access with the PowerLink

A PowerLink is a game-changer for enhancing access, especially for users who rely on switches to interact with the environment around them.  With a PowerLink, users can take everyday, corded, electrical appliances and make them switch accessible.  The concept is simple: plug a corded appliance into the receiver of a PowerLink, pick your interaction mode on the PowerLink, and add a switch. With this setup up users can control the on and off function of whatever corded appliance is plugged in.  The PowerLink opens the door for participation in a variety of everyday activities.  

  • Enhance Access with the PowerLink in Classrooms and Offices: Tools commonly used in the classroom or in an office setting are easily made switch accessible using a Powerlink. Try plugging in an electric pencil sharpener, electric stapler, electric hole punch, or paper shredder to allow switch users to become an active participant in vocational training opportunities or classroom jobs.  
  • Enhance Access with the PowerLink in the Garage: In woodshop class or in your home garage some simple, corded tools like an electric screwdriver or hand held sander can be made switch accessible with a Powerlink.  
  • Enhance Access with the PowerLink in the Kitchen: In the kitchen, plugging in simple appliances like a blender, hand mixer or can opener to a PowerLink can help users increase their participation in cooking activities.
  • Enhance Access with the PowerLink for Self Care: A well-positioned hair dryer plugged into a Powerlink can give users more independence with self care tasks like drying their hair after a shower or fingernails after a manicure! 

Looking for fun and creative ways to use your PowerLink? Download these activity ideas:

  1. Accessible Splash Art
  2. Make Music!
  3. Stimulate the Visual Senses!
  4. Switch Adapted Car Wash
  5. Switch Adapted ‘Bowling’

Assistive Technology for Virtual Learning

2020 has brought a whole new set of challenges where we as educators need to get creative. Simple low to mid-tech assistive technology tools can make the virtual learning experience less stressful and more productive for all students. 

Here are some simple low tech tips and tricks to make virtual learning easier. 

  1. Use a visual schedule.
    • Why? Visual schedules allow students to visually see an overview of their entire day. This can help reduce frustration and ease the anxiety relating to transitions.
    • What?  These schedules should include the time each activity is occurring and a picture or word to represent the activity. These schedules can be created using real photos, images, or icons. 
    • Easy Option: For a ready to go option, our new  SchKidules provide these symbol representations for everyday school and home-based activities. 
SchKidules Low Tech Assistive Technology used in virtual learning
  1. Make sure your laptop is at the correct angle and height.
    • Why? When a computer is too low, it creates a tendency for the body to lean forward. This causes strain on the neck and discomfort!
    • How?  One great way to create the correct angle and height is by using a slant board and a piece of Dycem. Place the Dycem on top of the slant board and the laptop on top of the Dycem. The Dycem will create a non-slip surface so the laptop does not slide off. Ahhh…relief from neck pain!!
  1. Break down visually overwhelming information.
    • What? When using worksheets or printed work, the directions and visuals may be visually overwhelming for students who have difficulty filtering out extraneous visual stimuli.
    • How? We can reduce these visual distractions by using highlighter strips, reading guides, or even laminated index cards. The student can guide these low tech tools across their piece of paper to block out all extraneous material and focus on each sentence they are trying to read. 
  1. Use adapted tools whenever needed .
    • Why? Students with physical disabilities should be supplied with adapted tools to promote the most independence as possible. 
    • What? Examples of some of these tools include, adapted scissors, EazyHolds, and the Functionalhand.
      • Adapted scissors allow students with decreased fine and gross motor abilities to independently use scissors. A variety of options exist including scissors on a sturdy base, scissors that open on their own, and scissors that don’t require the user to place their fingers in the holes
      • EazyHolds and the Functionalhand allow a student who does not have a functional grasp pattern to independently use a pencil, marker, spoon, stylus, etc.  The Functionalhand can give a student a sturdy grip on objects while allowing the student to use the object at a functional angle. The Eazyhold can be used in conjunction with the Functionalhand to securely hold the handle of the Functionalhand in the student’s hand. Eazyhold can also be used on their own to support independent grasp of everyday objects (e.g., cups, brooms, spoon, etc.)
Push down scissors assistive technology solution
  1. Provide alternative access solutions when necessary. 
    • What? If a student cannot independently access virtual work, they should be provided with an alternative way to access the material, whether that is on the computer or via printed materials. 
    • How? A BIGtrack 2 trackball, provides a sturdy base with a rolling ball that can be used in lieu of a typical mouse.  

There are many options available to make virtual learning more accessible, we hope you have found a tip or two to make your virtual learning experience successful!