Assistive Technology for Virtual Learning

2020 has brought a whole new set of challenges where we as educators need to get creative. Simple low to mid-tech assistive technology tools can make the virtual learning experience less stressful and more productive for all students. 

Here are some simple low tech tips and tricks to make virtual learning easier. 

  1. Use a visual schedule.
    • Why? Visual schedules allow students to visually see an overview of their entire day. This can help reduce frustration and ease the anxiety relating to transitions.
    • What?  These schedules should include the time each activity is occurring and a picture or word to represent the activity. These schedules can be created using real photos, images, or icons. 
    • Easy Option: For a ready to go option, our new  SchKidules provide these symbol representations for everyday school and home-based activities. 
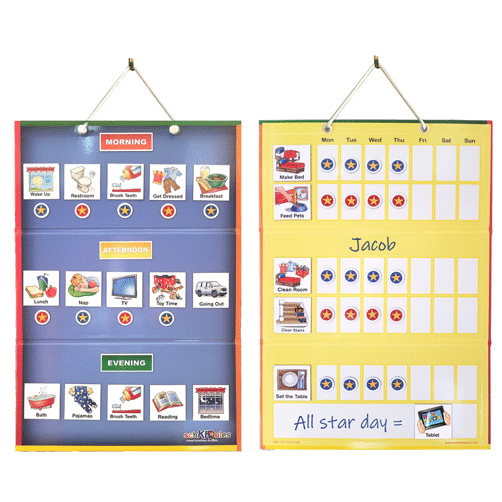
SchKidules Low Tech Assistive Technology used in virtual learning
  1. Make sure your laptop is at the correct angle and height.
    • Why? When a computer is too low, it creates a tendency for the body to lean forward. This causes strain on the neck and discomfort!
    • How?  One great way to create the correct angle and height is by using a slant board and a piece of Dycem. Place the Dycem on top of the slant board and the laptop on top of the Dycem. The Dycem will create a non-slip surface so the laptop does not slide off. Ahhh…relief from neck pain!!
  1. Break down visually overwhelming information.
    • What? When using worksheets or printed work, the directions and visuals may be visually overwhelming for students who have difficulty filtering out extraneous visual stimuli.
    • How? We can reduce these visual distractions by using highlighter strips, reading guides, or even laminated index cards. The student can guide these low tech tools across their piece of paper to block out all extraneous material and focus on each sentence they are trying to read. 
  1. Use adapted tools whenever needed .
    • Why? Students with physical disabilities should be supplied with adapted tools to promote the most independence as possible. 
    • What? Examples of some of these tools include, adapted scissors, EazyHolds, and the Functionalhand.
      • Adapted scissors allow students with decreased fine and gross motor abilities to independently use scissors. A variety of options exist including scissors on a sturdy base, scissors that open on their own, and scissors that don’t require the user to place their fingers in the holes
      • EazyHolds and the Functionalhand allow a student who does not have a functional grasp pattern to independently use a pencil, marker, spoon, stylus, etc.  The Functionalhand can give a student a sturdy grip on objects while allowing the student to use the object at a functional angle. The Eazyhold can be used in conjunction with the Functionalhand to securely hold the handle of the Functionalhand in the student’s hand. Eazyhold can also be used on their own to support independent grasp of everyday objects (e.g., cups, brooms, spoon, etc.)
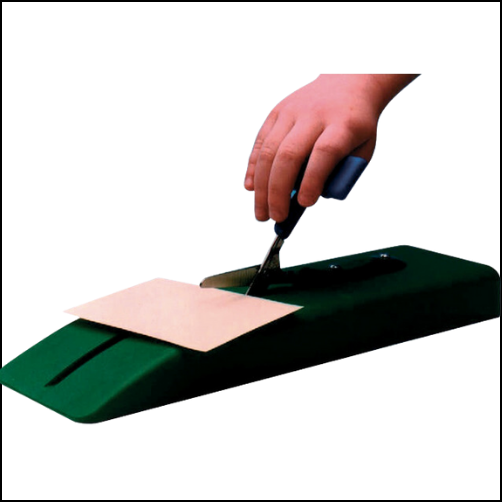
Push down scissors assistive technology solution
  1. Provide alternative access solutions when necessary. 
    • What? If a student cannot independently access virtual work, they should be provided with an alternative way to access the material, whether that is on the computer or via printed materials. 
    • How? A BIGtrack 2 trackball, provides a sturdy base with a rolling ball that can be used in lieu of a typical mouse.  

There are many options available to make virtual learning more accessible, we hope you have found a tip or two to make your virtual learning experience successful! 

S’Cool Moves Webinar Review

On Tuesday, September 15, 2020 Therapro was happy to host another very successful and well attended webinar, S’Cool Moves, presented by Dr. Debra Em Willson.  Dr. Wilson is a reading specialist and founder of S’Cool Moves.   Webinar attendees left with some great strategies to use for both in person and virtual learning sessions, as one viewer stated:

S’cool Moves has changed the way I practice OT in school. Incorporating Deb’s movements with academics has allowed my students to be so much more engaged and motivated. Her activities can be adapted to every grade level. DF

During the webinar, Dr. Wilson covered her “Top 10 Superrmoves”; that she uses to help students “flip the learning switch”.  Some highlights included: 

  1. Checking In With Myself Tool.  Dr. Wilson shared a visual to use with students to facilitate the “checking in” process and demonstrated a  great example of how to use this visual to help students get out of a “funk”.  
  2. I Can Calm Myself Routine.  Dr. Wilson shared deep pressure activities  students can use for calming and shared a visual that can be individualized for each student.  
  3. Core Out the Door & Minute Moves for Fine Motor. For these super moves, Dr. Wilson demonstrated how she incorporated the Minute Moves activities to a whole class setting, a great resource for therapists doing ‘push in’ services.  
  4. Smiley Jumps, Arrows, & Quadrant Activities. For these super moves, Dr. Wilson demonstrated how she created a simple DIY magnetic board to facilitate using these movement activities in virtual lessons, making the learning session more interactive!

In addition to these great resources, Dr. Wilson shared some great research to support her approaches. As one viewer stated:

I will be taking all of the activities / resources /website, etc, directly to my Title One teachers tomorrow and know they will be interested and use! I have provided many suggestions, activities etc. and even though well received, are not always implemented. Now I can say this comes from a reading specialist. Teachers listen to teachers and I am thrilled as an OT to use anything that will help kids. Deb was wonderful! Generous heart and knowledgeable lady….thank you so much! BW

If you missed the webinar, be sure to check out the recap.

Get A Grip on Pencil Grips and Adapted Writing Tools!

Therapro is making it simpler for users to choose the right pencil grips and adapted writing tools.  After reviewing all of the pencil grips and modified writing tools available at Therapro, we concluded that there are basically three groups that these tools fall into: comfort, positioning, and sensory.  

Comfort.  Comfort is an important feature for writers across the lifespan. These types of grips and writing tools are great for writers who fatigue during longer writing tasks or who have underlying conditions that cause pain, like arthritis. The PenAgain was designed to help reduce hand cramping during writing. The Standard Foam Grip and the Bulb Shaped Grip are basic, low profile grips that can be added to a pencil or pen to provide a softer surface for the fingers.  These grips and writing tools may help a writer perform writing tasks longer.

Positioning.  Appropriate pencil grasp is the key for successful, legible handwriting.  Atypical grasp patterns can lead to decreased comfort and endurance for writing tasks. When to use a pencil grip or a modified writing tool often prompts debate.  

Young writers often benefit from developing the foundational skills needed for successful handwriting before a grip is used. These writers benefit from activities that assist in developing foundational postural musculature and hand skills. Working with putty, incorporating yoga, doing activities on the therapy ball,  or incorporating activities like those found in the Fine Motor Olympics or Fingermania are all great ways to target underlying foundational skills needed for functional hand use. During this stage, it is also important to incorporate writing “tools” such as short pencils or crayon rocks that naturally support functional grasp patterns.

Pencil grips for positioning come into play primarily when 1) the student is still working on developing underlying foundational systems, and they need to keep up with peers or  2) when the student benefits from the tactile cues provided by these grips or writing tools to maintain a proper pencil grip.  There is a wide range of grips and writing instruments available, allowing for grading of the support provided. 

Writers who are just learning to get their fingers into a tripod grasp benefit from a grip that provides more support.  Therapro suggests the following:

  • The Grotto Grip has contours that place the fingers in a tripod grasp and promote an open webspace, this type of grip is also great for writers with hypermobility in their finger joints.  
  • Grips like the Writing Claw, the Pointer Grip, the Crossover Grip or StartWrite Pencil Grip have features that block fingers from “crossing over” or reverting to immature grasp patterns.   

Writers who need less support may benefit from grips that are “low profile”.   Grips like the Solo Grip, and the Stetro Grip are smaller in size than some of the other grips in this category. They  provide light tactile cues to remind the writer where to place their fingers but do not actively block the fingers from moving out of a tripod pattern. 

As the writer’s abilities progress, they may be ready to move away from using a grip but may not be quite ready for a standard pencil. This is where triangular-shaped pencils like the Try Rex Pencil come in. The triangular shape offers a subtle tactile reminder for proper placement of the fingers.   

Sensory. The final category of pencil grips and writing instruments is sensory.   To simplify this, the sensory category can be viewed as two ends of the sensory spectrum: alerting or calming/organizing.  

Light touch sensations are interpreted by our sensory systems as alerting, think about a spider crawling over your arm!  The grips and writing tools in the alerting category provide light touch sensations to  help writers “wake up” their sensory systems.  This type of input can improve the ability to attend and focus.  Great options for this are:

  • The Spike Tactile Grip.  The Spike Tactile Grip is covered in spiky protrusions that provide opportunities for light touch sensations. As a bonus, these protrusions can be used as a “fidget” to help with attention and focus during writing tasks. 
  • Grips like the Bumpy Grip and The Extreme Grip offer slightly more subtle raised tactile features but still provide great sensory input to help maintain attention and focus during writing.  

Some writers have poorly organized sensory systems; these writers benefit from organizing input and input that provides clues about where the writer’s body parts are. Sometimes these writers use too much force when they are writing or they have a hard time writing on the given baseline.  Adding weight to writing tools is a great way to help these systems become more organized, try the following:

A bonus tip, adding weight to writing tools may help those with hand tremors! 

In summary, understanding both the needs of the user and the type of support and the level of support grips and writing tools offer is a great starting point for determining the most appropriate grip or writing tool to choose.  Starting with the least restrictive option is a great way to ensure the writer is getting the support they need without overdoing it.  Conversely, using a grip or writing tool that provides a lot of support may be appropriate for the student who is working on developing foundational skills to ensure a positive writing experience.  For therapists, this grading system is a great way to show progress as students move from a more restrictive tool to one that offers less support.   The information contained in this post is condensed in the Get A Grip on Pencil Grips and Which Writing Tools or Accessories Handy Guides.  We hope these handy reference guides help you quickly identify the tool that will best fit your needs!