Tag Archives: classroom strategies

Classroom strategies encompass OT-informed approaches that support attention, posture, sensory needs, and motor skills to help students succeed academically and socially.

Move Mindfully Card Deck and Sensory Systems

Therapro is excited to offer the Move Mindfully Card Deck, available at our store. This product helps integrate physical fitness, mindfulness and social emotional skills into practice. The deck not only offers individual poses, but also routines to address a variety of common needs, such as “accident prone” and “lethargic”.

As a Blog Bonus, we are offering a free download of three poses from the card deck to get you started with a simple routine.  Read on to learn more about each pose and how it relates to your Occupational Therapy goals.

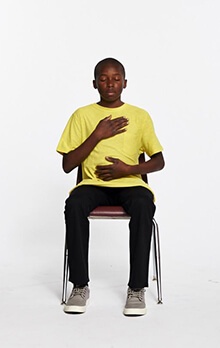
Belly Breathing

Belly Breathing

Getting into the Pose:
Belly Breathing is often taught with the Hoberman Sphere. The brightly colored, collapsible tool offers a visual tracking point to feel the diaphragm expand and contract. However, hands can simply be placed at heart and belly when teaching belly breathing as well. To start, we recommend a seated position in a chair, for back support. As a modification, this pose can also be completed laying on the floor. In this position, try a small object or toy placed on the belly for extra visualization of the up and down movement.

Therapy Resource:
Belly breathing is a great way to work on postural stability while maintaining an upright position without a collapsed trunk or slouched shoulders. This pose also taps into interoception and body awareness as breathing is tracked.

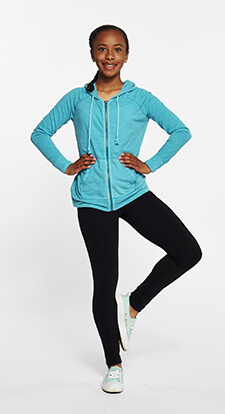
Tree Pose

Tree Pose

Getting Into the Pose:
Tree Pose is an introductory balancing pose that all body abilities can enjoy. We start by cueing the heel to touch the ankle. As balancing progresses, the foot can be placed on the calf or thigh. However, make sure to avoid any pressure on the knee joint. The hands press together at midline, palm to palm, providing additional input.

Therapy Resource:
Like belly breathing, this pose works postural stability through core activation in a static hold. It also works on bilateral coordination as hands and feet press towards midline while maintaining balance and focus. The stacking of joints over the anchored foot (ankles, hips, wrists) taps into theproprioceptive system. If you need additional proprioceptive input in this pose, try stamping feet before attempting to hold static. Activate the vestibular system by experimenting with the foot and hand placement.. Also, try small movement, such as swaying, within the pose. Work on vision by providing various focal points experimenting with gaze up, out, down and even eyes closed. If you see the MORO Reflex in this pose, return to Belly Breathing.

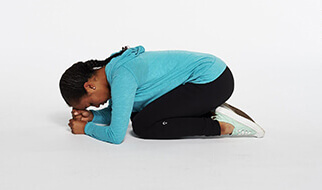
Child’s Pose

Child's Pose

Getting Into the Pose:
Child’s pose is often used at the beginning or the end of a session. However, it can be used whenever there is a need to decrease overstimulation. It can be completed on the floor or at a table.

Therapy Resource:
As you cue stacked fists, you are working on bilateral coordination and proprioception as joints are stacked together at midline. On the floor, there is the additional tactile input from the legs and arms on the Earth. Seekers may need to rock, or add extra movement to the pose, while avoiders may have to stay more upright. Offer a vestibular system modification of seating in a chair, hands stacked on forehead and chin slightly tucked.

Guest Blogger: Stephanie Kennelly

About Us-

This blog post is a collaborative effort of Sweet Inside Yoga and 1000 Petals.

Sweet Inside Yoga is a company providing resources for occupational therapy, physical therapy, mental health practitioners, classroom teachers, yoga teachers, professionals, parents, and others in the community to use with individuals who can be found seeking and/or avoiding yoga activities.

1000 Petals is a well-being training and consulting company based on the science and practice of mindfulness and movement. They provide integrative mindfulness and movement solutions in workshops, events, retreats and self-care classes.

Teaching Scissor Skills: Cutting Tips for Young Children

OT goals on IEPs and IFSPs for young children commonly include teaching scissor skills. There is a good reason for this: using scissors independently and safely is an important preschool classroom skill.  For OT’s, it is also a benchmark for bilateral control, dissociation of the sides of the hand, and the ability to control and grade force.  But what do you do with kids that aren’t interested or prepared to cut?

Many young children are eager to learn to cut with scissors. They are excited to control such a grown-up tool and they like to see the immediate effects of their actions as the paper bits fall to the floor.  Not all interest results in a good outcome.  At times, they are so enthusiastic that they act in unsafe manner or use scissors in inappropriate ways.

Some kids fear scissors; they are often the children who fear failure and shrink from a challenge.  And finally, there are children who have little interest or excitement in participating in any fine motor tasks.  Whether due to frustration or a preference to act on their environment with sensory-based or gross motor skills, their behavior suggests that they couldn’t be bothered by learning to use scissors.

Children that struggle to cut can become discouraged and lose their initial excitement for mastery of this important skill.  By allowing them to observe and practice pre-training skills before you introduce the act of cutting, you can improve your chances that they will develop and sustain enthusiasm and good safety skills with scissor activities.

There are children over 3 who have never been allowed to use a scissor due to adult safety concerns, lack of appropriate tools/assistance or developmental delays.  A child’s initial exposure to scissors can be as simple as directing a child’s visual regard to your use of scissors as part of a therapy activity.

  • Make sure that you narrate your actions in short phrases with emphasis on action words.
  • Use an enthusiastic tone and gestures that sustain the child’s attention and interest.
  • Make practice short: in fact, end practice before a child is frustrated or bored.
  • Finally, make it clear that you expect that the child will be able to use scissors as they grow and develop more hand skills.

Children benefit from being able to see an adult’s hand movements while cutting.   Your students may have been discouraged from being too close to an adult model due to safety concerns.  Some adults are unaware that children need exposure to develop interest and excitement in the use of scissors.  Use the safest scissors available with impulsive children who may reach for your scissor blades in their eagerness to learn about this exciting tool.

Ultra Safe Scissors a great option when Teaching Scissor Skills
Ultra Safe Scissors

Once interest has developed, you may want to assist children as they open and close the blades.  Scissors that are spring-loaded or have finger spaces for an adult can help, or you could place your fingers between the handles to facilitate movement.  The sound of the blade movement is fascinating to young children, even without bringing the blades to the paper for cutting.  Practicing alternating opening and closing the blades may be your entire activity for the therapy session.  By breaking down the actions of scissor use into their precursor parts, you are decreasing a child’s frustration and increasing the likelihood of later success.  Hand-over-hand assistance can be helpful when combined with independent scissor use. Gradually fade out this assistance out to allow maximal proprioceptive and kinesthetic input.

Children with hand and wrist weakness or poor sensory registration and discrimination benefit from scissors that provide more support and allow more of their hand to be involved in cutting.  Create textured handles with tape on classroom scissors or use Fiskars Total Control Kids Scissors that provide more digital control and encourage activation of intrinsic musculature to support development of the horizontal and vertical arches in the hand while cutting.

Adapted scissor for Teaching Scissor Skills

Spring Action Blunt Tip Scissors for Teaching Scissor Skills
Spring Action Blunt Tip Scissors

Provide additional postural support to children with instability and core activation issues. They may require more proximal stabilization than they appear to need for other tasks. Well-chosen classroom chairs or even a corner sitter may give a child the motor support needed to achieve optimal stability for learning a new motor skill. Beanbag chairs diminish sensory-based distractibility while providing full-body support. Once the new skill is mastered, the degree of support can be decreased gradually.

Bean Bag Chair
Bean Bag Chairs

By focusing more on pre-scissor activities and thereby maintaining a child’s enthusiasm and attention to task, you will increase their ability to persist with practice and have a more productive therapy session!


Guest Blogger: Cathy Collyer, OTR, LMT, PLLC

Cathy Collyer, OTR, LMT

Cathy Collyer, OTR, LMT has treated children with neurological, orthopedic and sensory processing disorders for over 20 years. She is the author of The Practical Guide To Toilet Training Your Child With Low Muscle Tone.

Simple Hacks to Optimize Backpack Safety and Organization

One of the essential back-to-school items on every parent’s shopping list is a new backpack.  Beginning in preschool and progressing all the way through high school, kids use their backpacks every day.   As therapists, we are aware that how that backpack is filled and carried will either create problems for kids or solve them.   A pack that is too heavy, so full that it creates perceptual, sensory or cognitive roadblocks to organization, or missing essential tools for kids with special needs, is not doing it’s job.  With targeted education and the introduction of simple alternative strategies, we can improve the chances that backpacks end up helping every child perform well during this school year.

Here are some ways to help students manage their backpacks for optimal performance throughout the school year:

  • Lighten up. Kids tend to make their packs heavier than they need to be.  Hypermobile kids, kids with orthopedic issues and kids with low tone may be carrying packs that put them at significant risk for injury.  Make sure parents are aware of this issue, and help them by suggesting a review of backpack contents and downsizing the “essentials” whenever possible.  Small water bottles, travel sizes of toiletries, and a minimum number of pencils, pens or markers lighten the load.  For kids that aren’t aware of the sensory or cognitive overload of an overfilled pack, a backpack checklist or a smaller pack help them manage without an adult assuming responsibility for content management.

Highlighter Strips, a helpful tool for organization

  • Teach kids how to pack and wear their pack. The heaviest items should be carried close to the body and content weight should be distributed equally across the back. Kids should use both straps when wearing their backpack.  The one-shoulder carry can be preferred by middle-schoolers wishing to look “cool”.  This overweighting of one side of the body puts them off balance and at-risk for injury.  It may be hard to change habitual behavior in children at this age.  Try identifying the child or children who seem to be admired and copied by their peers.  Influencing the kids who are acknowledged social leaders can change class culture quickly.   Don’t wait until children report neck and shoulder pain, but remind parents and teachers that the risk of strains, sprains and exacerbations of issues seen in tweens and teens like scoliosis are real.
  • Frequently used items should be quickly accessible in surface pockets, and items they need for their first class are reachable when they open their pack, not packed under other materials. Laminated photos of pocket contents can help children learn the habits of efficient storage.

Tactile Ruler

  • Help kids remember to use their sensory tools by having them handy. Tools like Highlighter Strips and the Desk Buddy Multi-Textured Ruler are slim and can be left between pages of a book or workbook, ready to be used.  Calming tools like the Wristful Fidget can be worn, not shoved into a pack.  Since it looks like a sport wrap, kids aren’t as eager to toss it away when they pack up and go!  Kids may need more than one set of tools so that they can leave a set at school and another one at home. Items that do more than one job, like the Desk Buddy Ruler, have an advantage over carrying a bunch of fidgets and then an equal number of classroom tools.

Wrist Weights

  • Accept that altering behavior is a long game. Don’t get discouraged if kids only use some of these strategies to improve how they manage their backpacks.  Habits change slowly, and as the demands of the school year mount, it may take periodic reviews and revisions to find the right combination of equipment, organization and carrying strategies to make a difference!

Gueste Blogger: Cathy Collyer, OTR, LMT, PLLC

Cathy Collyer, OTR, LMT has treated children with neurological, orthopedic and sensory processing disorders for over 20 years.  She is the author of The Practical Guide To Toilet Training Your Child With Low Muscle Tone.  Learn more about her work at tranquilbabies.com.